by Jon Stefansson
There are of course many different ways to create a laser, but
this one is fairly easy to implement. I will use 3 patch grids
for the mesh and the material will be a bitmap for the opacity
and a self-illuminated diffuse. I use 3D Studio Max 2.0 but this
tutorial should be almost identical for older versions of Max,
and the method could apply for more 3D programs.
Step 1. Create opacity map
To create a bitmap, I use Photoshop, but you should be able to
use any decent paint program.
Since the bitmap will be used as opacity map I use a grayscale
image, and it should be shaped as a laser. I create a bitmap that
is 320 x 30 points, and paint it like this:

You can of course shape the laser to your likings. I save the
bitmap as laserop.gif.
Step 2. Create the laser
mesh
Start up 3D Studio Max. Go to the Create
panel, Geometry, select Patch Grids
and Quad Patch. In the Top viewport,
draw a quad patch of width 5 and height
200 and check Generate Mapping Coords.
Go to the Modify panel and select UVW
Map. Set Angle Snap to On, select Front
viewport, select Rotate and while
holding the Shift button down, rotate
the quad patch 60°. Select Number of Copies = 2
in the Clone Options window. Now the Front and
Perspective panels should look something like this:
 |
|
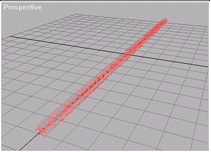 |
| Front panel |
|
Perspective panel
(after a zoom and a rotate) |
Step 3. Create the material
Go to the Material Editor. Select the first
slot and rename the material to Laser. Go to the Maps
rollout and click the button next to Opacity.
From the Material / Maps browser, select Browse
from New and then Bitmap. Under the Bitmap
Parameters, click the Bitmap button and select the
bitmap you just created (laserop.gif). Under the
Coordinates rollout, set Angle W to -90.
Click the Go To Parent button. Click on the Diffuse
color, and select the color you want for your laser (I use
RGB=255 0 0 for a red laser). Then click on the Diffuse
color, hold down the mouse button and drag it over
the Ambient color and select Copy. Set Shininess
and Shin. Strength to 0 and Self-Illumination
to 100. Finally check 2-Sided.
Step 4. Assign material to
mesh
Select the three quad patches and click Assign
Material to Selection button in the Material Editor.
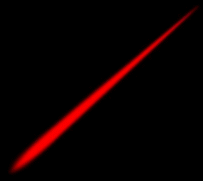
Render, and your laser should look something like this:
Tips: If you want a hotter core (i.e. you want the laser to be
a bit white in the middle) you can use a bitmap in the Diffuse
material. Just take the original laserop.gif and paint it like
you wish, and assign it to Laser material. Try it!
Comments? Suggestions? Send e-mail to jogus@earthling.net