by Travis Stout
Ahh, lightsabers. The weapons
of the Jedi Knights. Elegant. Deadly. And a real pain
to render properly. Until now. . .
Step I: The Setup.
The first thing you'll need is a
nice lightsaber model. I used Justin Jacobs's model of Obi-Wan Kenobi's
lightsaber for this tutorial, but any mesh will do. To create the
blade, make a cylinder with a radius of 0.5 units and a height of 25.
This should get you a nice, long column for your blade. Since the
tip of a lightsaber is rounded, now create a hemisphere with a radius of
0.5 and move it into position on top of your cylinder. You should
also move the cylinder along the Y-axis until it just barely touches the
top of the lightsaber's emitter (that nifty bell-shaped thing on the top).
For simplicity's sake, attach the hemisphere to the cylinder. Finally,
right-click on your new object, go to the "Properties" tab, turn on "Motion
Blur," and give it a G-buffer Object Channel of 1. Here's what we've
got so far:

(Not very impressive, is it?)
Step II: I'm Dreaming of
a White Saber Core. . .
As any simpleton knows, lightsabers
have a bright white core to them. So, be a good little animator and
open the Material Editor and create a new Standard material called Saber
Core 1. Set the material's ambient, diffuse, and specular to white,
then switch Shininess and Shin. Strength to 0, and Self-Illumination to
100. Give this material a material effect channel of 1, then assign
it to your blade. It should look more or less like this:

(Getting warmer)
Step III: Everybody Loves
the Video Post!
a) First, you need to set
up your motion blur, since we all know and love that groovy pulsing thing
that lightsabers do. If you followed the directions so far, your
blade should already have Object Motion Blur turned on. Now, open
Video Post, and click Add Scene Event, and set the View parameter for whichever
camera you'll be using. Now click on Render Options and check Object
Motion Blur. The parameters I found looked the best were Duration
(frames): 0.5, Samples: 10, and Duration Subdivisions:
10. To see what this will look like, click the Animate button and
swing the saber around some. You should get something like this:

(Hey, where'd my nice white core
go? Welcome to Motion Blur Hell!)
b) OK, now we've basically
destroyed our nifty white core, right? WRONG. We'll get to
that in a minute. Now, add an Image Filter Event, specifically, Animated
Glow. Give it the following parameters: Material Effects Channel:
1, Color: User (we'll discuss that in a moment), Min. Size:
30, Max Size: 35, Frames/Cycle: 5. These settings will
get you the proper size and intensity of the saber's glow. As for
color, for now just use an RGB value of 47, 189, 255 for a blue saber.
At the end of this tutorial, I'll present a list of other colors for your
benefit. Now, our saber looks like this:
(Getting closer. . . the core still
isn't white enough, though.)
c) Now, for the last little
trick: Remember when you gave the saber blade an Object Channel of
1? Well, now go into Video Post (if you aren't there already), and
add another Image Filter event, this time a Super Glow (Note: Animated
Glow and Super glow are both freeware plugins, you can download them at
www.3dcafe.com.)
Anyway, give Super Glow the following parameters: Glow Color:
Doesn't matter, we won't be using it. Glow Radius: 1, Radius
Noise, Glow Intensity, and Intensity Noise: 0. Leave the values
for Core Parameters as they are. Lastly, set Object to 1, and render.
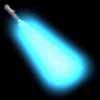
If you did everything right, you should get this (If your blade isn't this
wide, don't worry. These shots were taken in the middle of an animation
of a lightsaber being flailed about.):

(Eureka! A lightsaber at last!)
Congratulations! You made it!
Now you can make a lightsaber that looks pretty darn close to the one in
the movies! As promised, here are some other RGB values you might
find useful for other lightsabers:
Red (Darth Vader, Jerec and Maw from
Jedi
Knight): 255, 0, 86
Orange (Gorc and Pic from Jedi
Knight): 255, 146, 40
Yellow (Yun from Jedi Knight):
255, 255, 75
Green (Luke Skywalker, Kyle Katarn
from Jedi Knight): 75, 255, 75
Blue (Obi-Wan Kenobi, Anakin Skywalker,
Sariss from Jedi Knight): 49, 189, 255
Purple (Mara Jade, Boc from
Jedi Knight): 198, 60, 249
One last thing. To download
the MAX file used for the animation in this tutorial, as well as a sample
AVI of the saber in action, click here.
Comments and suggestions may be directed
to travis97@gte.net.