by Ian Palmer
Imagine the scene - you've spent two weeks building the most detailed model ever. The
mapping is perfect, the textures add that realism you've only dreamed of, the detail of the
mesh is going to make people go "WOW!!" You put your model into a scene - set the camera up,
add a planet, some laser blasts. It's going well. Then you come to light it...
15 Omni lights later the scene looks awful. The model is so over exposed that there are no
shadows, the image is flat, lacks any depth or dynamic and in no way does it justify all
that time spent modelling and mapping. You're stunning Star Wars image will never see the
light of day. It just looks awful!
I despair sometimes when I see a perfectly good image ruined by poor lighting. Whilst some
consider the use of light and shadow to be the least important detail of a long and lengthy
process, I on the other hand consider it to be one of the most important. Good lighting can
make the most rudimentary of models look far more detailed than it really is, as well as
adding mood and dynamism to an otherwise static 2d image.
Take the following images as an example:
 |
|
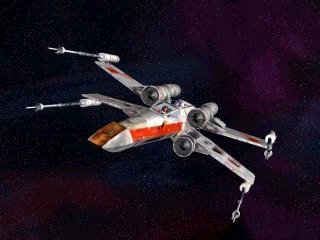 |
| Most impressive... |
|
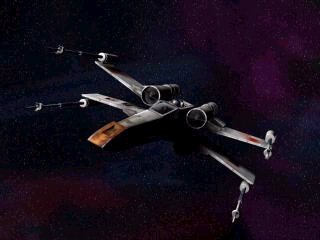
You are not a Jedi yet... |
Example 1 uses one Omni light, with shadow casting applied. Example 2 also uses an Omni
light with shadow mapping applied. The difference is the positioning of the light. The first
X-wing has a 3 dimensional depth about it. The second is flat and lets face it, boring!
One of the first things to remember when generating 2d imagery is that you have to work so much harder
than in 3d animation. You don't have the ability with a 2d artwork to make the ship fly overhead, or
spin around or explode into a million pieces. All that we can do is imply that the subject of our image
is in the process of doing something. Dynamic lighting and to a lesser extent camera positioning will
help transform your image, and add that sense of movement that's required.
Let's get out of here...
Right, let's get down to some numbers. One of the first considerations of any scene is: how
many light sources do I have? You have to be aware of what objects in your scene will be
emitting any kind of light. That could be anything from a sun, an explosion, and a nebula right down to
lasers and even planetary glows. Once you've got a handle on this, lighting the scene will become much
easier. For sun's I usually use an Omni light. I set the Multiplier to 1.5, crank the color up to white
and turn the "cast shadows" on. Shadow mapping is down to your own personal preference. I generally use
Shadow Maps as opposed to Raytracing. I find the shadows produced using Raytracing are sometimes too
"hard" for the scene. Shadow maps generate a softer feel. But hey, that's my preference. You're best
off experimenting. Incidentally, for those of you who want sharper shadows, but don't want to tie your
machine up Raytracing, increase the size of you shadow maps from the default 256 to 1024 and the Sample
Range (SmpRange) to 6. Crisp shadows without the rendering time.
As for other lighting, it depends on how subtle you want it to be. Nebula effects in the
background require only a Multiplier of around 0.6 - though it does depend on how vibrant the nebula
is. There's no point in having a faint nebula cloud in the background and sticking in a really bright
Omni light. Examine the scene and determine the relative strength of the extra lighting.

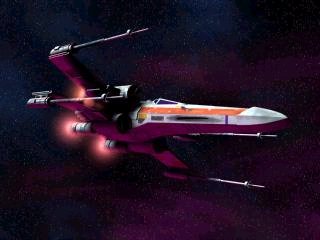
Hmm...Subtle lighting - Hmm...Too much!!
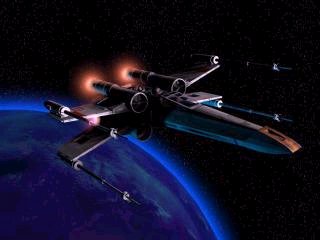
Planetary backlighting can add more sense of realism. Create another Omni light but set it
up to ignore the planet mesh that the light is supposedly coming from. Use the
include/exclude menu at the top of general parameters. Look at the example below, and read
on for further explanations.
 |
|
 |
| Planetary backlighting |
|
Where to place the light... |
The Omni is placed behind and under the X-Wing, in the same direction as the planet. I set
the light to ignore the planet, mainly because I don't want the light flooding the planet
from close range (you end up with all sorts of horrible highlights - if you don't believe
me, try it yourself). I set the Multiplier to approx. 0.8 and make small positional changes
until I've achieved optimum effect.
There you have it. My first instalment of lighting considerations. In the next thrilling
episode I'll move onto lighting tricks and f/x using MAX. Happy rendering...
Ian Palmer - Virtual Image Design