|
Creating
Space Backdrops in 3D Studio MAX
by Michael Unfried
I've
seen a couple of tutorials here on how to make attractive space backdrops,
but after playing with a couple of methods here & a method I read
in a book ("Inside 3D Studio MAX 2: Modeling & Materials),
I played around until I developed my own method of creating a good
Star/Nebula backdrop using only the Noise plug-in. I use 3D Studio
MAX 3, but the process is pretty much in the same in all versions.
I'm still a little new to MAX myself, so if you find something you
think is in error, or if you have any questions, please send me an
e-mail here.
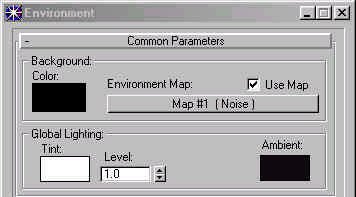
The
easiest way is to create a simple "noise" environment map.
Open your environment settings dialog and set "Environment Map"
to "noise" as shown below.
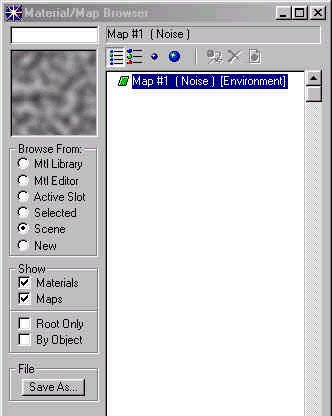
Then
open the material editor, select an empty material slot and click
 "Get Material". Select "Scene" from the radio
boxes on the left & then double-click the environment map material.
"Get Material". Select "Scene" from the radio
boxes on the left & then double-click the environment map material.
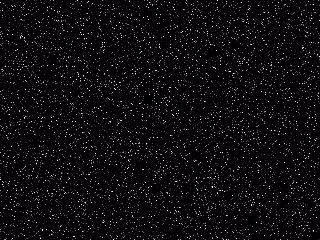
Now the
material slot should be showing a 2D image of "noise". First
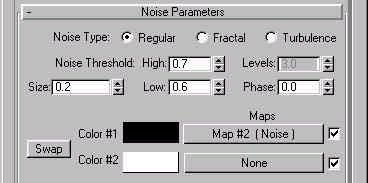
you're going to create the stars. Scroll down to the Noise Parameters
roll-out and change the Size to "0.2". Then set the
High threshold to "0.7" and the Low threshold to "0.6"
and do a test render. You should see a star field like the one below.
To decrease
the density of the stars, set the Low threshold to "0.65".
Now you're going to create a sub-map in the black part of the noise.
Click the rectangular button next to the black color swatch at the
bottom of the Noise Parameters roll-out and select "Noise"
again.
In you're
new noise map, change the Size to "50", both color
swatches to black, and set both maps to "Gradient Ramp".
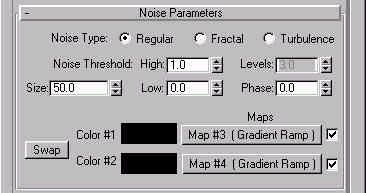
Change
the settings on the first Gradient Ramp as follows:
Double-click
the triangle on the far left of the color selector & set the color
to black, then set the right triangle to black, and finally set the
center color to whatever color you want your primary nebula color
to be. I like to use a gentle blue. Then scroll down to the
Noise section and change the settings to match the ones in the image
below.

When
you've got all the settings changed, click the  "Up to Parent" button. Click the map button for the
second Gradient Ramp, then change the settings for that ramp as shown
below. Most of the settings are the same, except for the color and
the Noise Size. Again you can set the color to anything you like,
but I prefer to use a deep red for the secondary color. Another
setting that changes for the second Gradient Ramp is the Phase.
For the image above, I used a Phase setting of "7.0", but
you can change the phase until the preview map show the level of blending
you prefer.
"Up to Parent" button. Click the map button for the
second Gradient Ramp, then change the settings for that ramp as shown
below. Most of the settings are the same, except for the color and
the Noise Size. Again you can set the color to anything you like,
but I prefer to use a deep red for the secondary color. Another
setting that changes for the second Gradient Ramp is the Phase.
For the image above, I used a Phase setting of "7.0", but
you can change the phase until the preview map show the level of blending
you prefer.

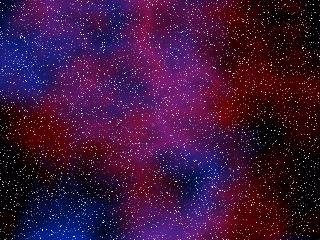
Now do
another test render. You should get an image just like the one
below, unless you used a different Phase or Size setting in you noise
parameters.
This
works great for still images, like the one at the top of this page,
but if you want to do animation, I recommend mapping this material
to a VERY Large sphere, flipping the normals, and making a few minor
changes to the material. For starters, if you map it to a sphere,
just skip the whole beginning until right after you would have done
"Get Material". Just create the material on the default
shader like you would for any new material. You will also want
to set the Self Illumination to "100" and the Specular Level
& Glossiness to "0". You don't want your background
to reflect light or have shadows. You can also alter the blending
of the colors by setting the Size of the Noise sub-map to a smaller
number. I don't recommend setting it any lower than "25".
Now you're ready to render! Hope you found this tutorial helpful.
Cerberus
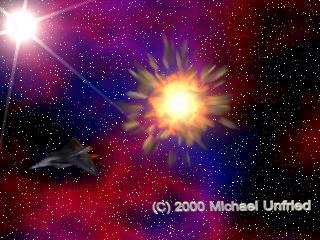
The
"Space Combat" scene at the top of this tutorial is copyrighted
by me.
You may use it anywhere you like, but you must include attribution to
me.
Comments and suggestions
may be directed to munfried@deer-park.isd.tenet.edu
|